Take advantage of Crew’s time-saving tools to manage employee shifts and schedules and to set up meetings. Crew Schedule lets you move beyond a static photo schedule to create a complete shift schedule within the Crew app. And unlike other shift scheduling services, Crew Schedule is free, and also completely accessible through your mobile device or desktop.
Ways to Share Your Crew Schedule
- Create your schedule directly on the Crew app
- Upload your hard copy photo schedule and let Crew Schedule help you optimize it
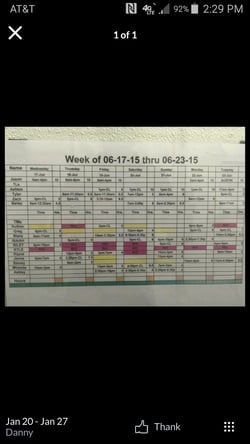
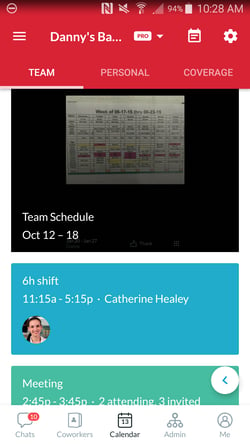
Photo schedule on its own (left); Photo schedule used with Crew Schedule (right)
Note From your Calendar tab you can manipulate a range of features, from shifts to meetings to time-off requests. For more info see the “Navigating the Calendar Tab” article.
With Crew Schedule, Admins and team members can
- Create and post new shifts
- Trade shifts by posting them as open
- Customize the details of each shift, or delete it
- Get reminder notifications two hours before a shift starts
Enabling the Crew Schedule Feature
Make sure to add the Crew Schedule feature from the Admin tab.
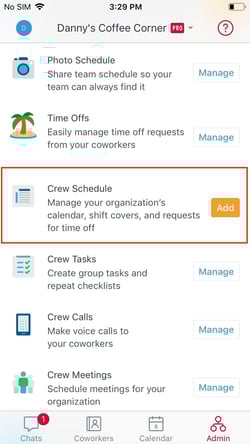
Add the Crew Schedule feature from the Admin tab
Creating and Posting New Shifts
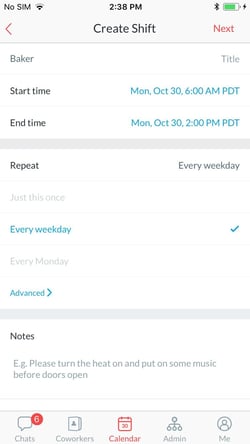
Create a Shift Simply tap the “+” button and select “Add a Shift” to create a new entry. You can specify a number of details about it. (See “Customizing Shift Details” below.)

Create a new shift from here
Open Shifts A new shift can be
- Assigned immediately to a specific team member/s
- Left unassigned, for an Admin to come back and assign later
- Made requestable, so that anyone in the Organization can request it. Note Only “requestable”—as opposed to “unassigned”—shifts can be requested by team members.
Team members can also post their own assigned shifts as open to get them covered by coworkers.
Note Subscribers to Crew Pro can determine the permissions for posting new shifts—either Admin-only or open to anyone in the Organization. Some Admins like the collaborative aspect of allowing team members to create their own shifts; some Admins find that method chaotic and prefer to restrict permissions to a small group of managers. Even in an Admin-only system, team members can still post their own shifts to request coverage.
Recurring Shifts You can also schedule a specific shift to repeat as often as necessary. Describe it once, then set it to automatically recur on your employees’ calendars daily or weekly.
Assign Multiple People to a Single Shift No need to schedule identical shifts for employees who all share the same job and time slot. Set up one shift and assign it to all those team members at the same time.
Customizing Shift Details
When you create a new shift you can specify many important details about it.
- Name the shift, e.g. “Bartender”
- Set the shift’s starting and ending dates and times, or select "All day"
- Choose how often the shift will repeat, if it does
- Assign the shift to someone on your team, or leave it open to assign later when you’re ready
Use this screen to set the details for each shift. You may need to proceed to the next screen to set all details.
Editing Shifts You can also change any of the details of the shift after you set it. To edit a shift
- Tap the shift box in the Team view of the Calendar tab
- Tap “Edit,” or the Edit icon, at the top of the screen
- If it’s a recurring shift you’ll need to choose whether to edit all instances of the shift, or just this one
- You can edit title, dates, times, and assignees
- Tap “Save,” or the Check icon, at the top of the screen to save your changes
You can also put out a call to see if more people are interested in working the shift by tapping the “Request more people to work” button from the shift Details screen.
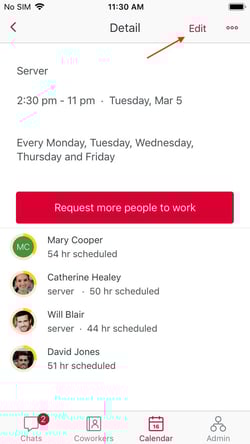
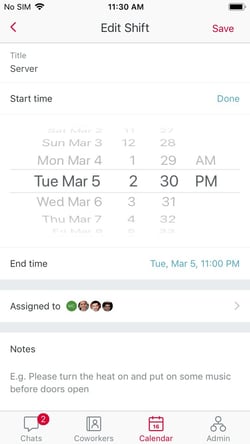
You can access the Edit screen, or request more people to work, from here (left); Edit shift details from this screen (right)
Deleting Shifts If you need to delete a shift, be sure to do so by using the three dots in the top right corner of the shift Detail screen. Deleting only the assignee will designate the shift as “unassigned,” but will not remove it from the schedule.
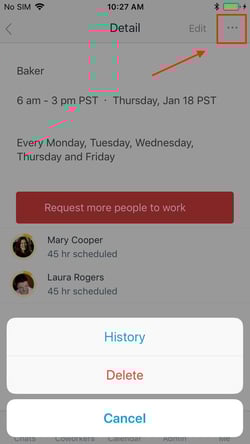
Delete a shift from the three dots in the upper right of the screen
Progress Indicator Avoid scheduling overtime with the Progress Indicator circle. The ring around a team member’s profile photo gradually fills with green as that employee progresses toward a full, 40-hour work week. After 40 hours the ring turns yellow to warn you that they are now working overtime. You can even designate on which day that work week will begin begin by going to the Calendar section of the Admin tab.
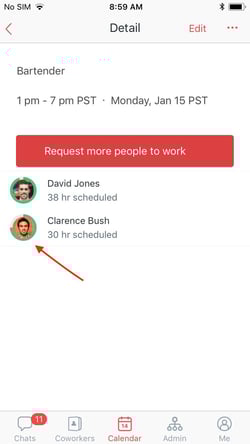
The green ring indicates how close this employee is to a full, 40-hour work week
Schedules change, shifts needed to be added or traded, meetings crop up on your calendar, and Crew Schedule can help you—and all your team members—stay on top of those changes. Cut down on missed shifts by making sure your employees know where they need to be and when.